Tuesday, July 30, 2013

QUILTING FOR CHARITY

Hey there! Just wanted to show you what I have been working on and maybe entice you to get involved.  If you can use a machine to sew a straight line you can probably complete this little quilt.  

I found out about this charity from  the blog MAKE IT AND LOVE IT.  The charity is called QUILTS FOR KIDS  and they donate quilts made by volunteers to children in hospitals with life threatening illnesses.  I have been wanting to do something like this for a long time and never got around to actually participating.  This organization made it really easy to jump in.

They provide the fabric already cut out and an instruction sheet.  For someone like me (and maybe you) who has the desire but limited time it was a perfect opportunity.  You do have to pay for the shipping (about $6) but the fabric is free.  You also have to provide the batting and pay to return the quilt to the organization.  All in all I spent about $25 for everything and finished the quilt in about 5 weeks-they request it be returned in 4-6 weeks.  I used a 40% off coupon from Joanns  and got a baby quilt size of warm and natural all cotton batting.  It was just the right size.  It was such a good feeling to send the quilt back and know that it may comfort a child who really needs it.

If you can sew even a little and you have been looking for a way to contribute, please check them out. Although I am a fairly experienced seamstress I have almost no quilting experience and I managed to do a decent (definitely not above average) job on the quilting. I don't really think the kids will care when they are snuggling it.   I also don't have a fancy quilting machine. I have a regular, old, basic kenmore sewing machine and it worked perfectly well making this small quilt.


 LINKY PARTIES
 

Thursday, July 18, 2013

TINY WRITING TABLE REDO


Still melting here.... just a couple more days.


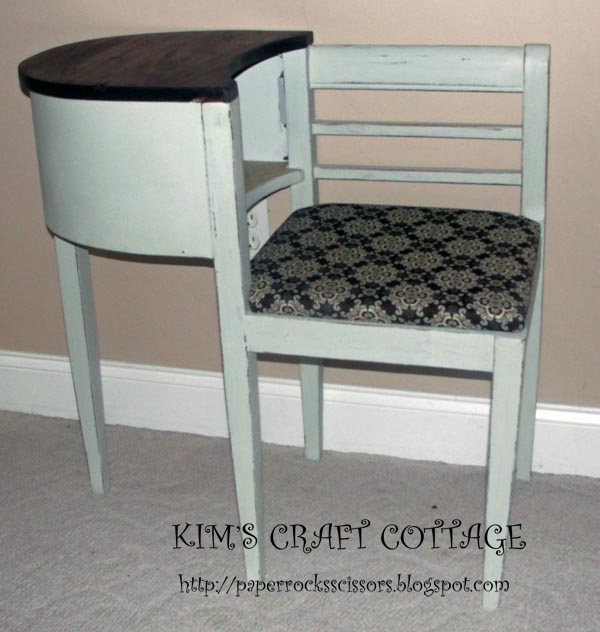
I found this sweet little writing/telephone table at my favorite junk store.
 I saw it and didn't buy it at first. But, I kept thinking how cute it would be
 with a paint job and new fabric.  I was sure when I went back it
 would be gone but there it was calling my name.

 Do you ever watch Mike and Frank on American Pickers?  They always say bundle things to get a good price. Well, this little table cost a bit more than I wanted to spend so I found a couple other things, made an offer and got a great price on everything. This is what she looked like before.  Dig that groovey green , wool fabric.

I gave it a good cleaning with my trusty krud Kutter (love that stuff) it removes all kinds of gunk and acts a little bit like a de-glosser.

I knew I wanted to paint it with the same chalk paint I used on my bathroom stand so I got out my Maison Blanche Sugar Cane and got to work.

First up was to strip and sand the top as I wanted to keep it a dark wood tone.  It had some nicks but I left them.  Adds character right?


Once stripped and cleaned, I first used Minwax Dark Walnut for the first coat.  It wasn't quite as dark as I wanted so the next coat was Rsutoleum Kona.  A couple coats of Dark wax and it was just right.
I removed the seat and painted the entire base with two coats of Sugar Cane.  I distressed it a little and added a couple coats of light brown wax.  

Here is a better pic of the top with the wax added.

I  took off  all that lovely fabric from the seat. All I can say is ick.  The board was in pretty bad shape so I used it as a template to cut a new one out of plywood.
I had some Warm and Natural batting left over from a quilt project so I used that for the cushion of the seat.  I cut 3 layers the exact shape of the seat and one layer to wrap around.  I used a staple gun to attach everything to the wood.
I then covered it in this cotton fabric.  I found it at Joanns and it was perfect with just a touch of the soft aqua color that was used to paint the base of the table.
I stapled the wrap around piece to the back, then added a piece on top to hide all the mess.
Lastly, I added some decorative scrapbook paper with a writing theme to the inside of the desk.  It looked too bare to me with just the paint.
This is residing in my bedroom for now but I am moving things around to find a better place for it.  

Thanks so much for stopping by!

Linky Parties
French Country CottageMustard Seed Creations Furniture Feature Friday

Tuesday, July 16, 2013

KITCHEN STOOL MAKEOVER

Hey there, howz it goin' I have been both busy and hot beyond belief.
 We are adding a garage on to our house and we had to remove the ac.
 Of course it is the hottest week of the year and we are melting. This is a pic of the house mid-construction.  Can't wait to get it done.  I will never again have to chant-while scraping a foot of snow off my car- I hate snow, I hate snow, I hate snow.

The good news is that I have spent a lot of time in the basement working on a bunch of projects.  This is a stool and corner shelf makeover quickie.  I tried out a new paint from the Plaster Paint Company. I will have a review of it along with some other chalk type paints in a future post.  The color is called Ivory Lace and it is a very slight off white color.

This is how the two pieces started out. One light and one dark wood.  Both are thrift store purchases.


They both got three coats of paint and a couple coats of light brown antiquing wax.
I also distressed the edges a bit and tried a new technique I found in blogland.  I wanted the distressed edges to be dark so I used a Minwax Wood Finish stain marker in dark walnut.  It is a flat tipped pen that is used to touch up stained wood but it makes a great antiquing tool.
We have had a boat load of hydrangea flowers in our garden and thankfully they are just about the only flower that doesn't make my husband sneeze.
I need to find a cool old-timey clock to put on the top shelf.
I have lots more to post, I just have to get around to organizing my photos and actually getting them on here.
Stay cool!