

Sunday, February 27, 2011
WHAT'S A HYBRID???
Friday, February 25, 2011
REFURBISH IT FRIDAY!
Happy Friday to you all! Welcome back to the second installment of FIF. If you are totally lost check out LAST WEEK'S RIF HERE.
 I picked up some up some Burnt Umber and Antique White paint at Joanns and grabbed my trusty foam brush. I got the Ceramcoat cause it was on sale. If you have suggestions about paint let me know if there is a better choice.
 This was after the first coat. Not pretty I know but I refused to get discouraged!
 After three coats, not bad. Still a little streaky but I am covering it with the antique white so it shouldn't matter.
 I only managed to get one coat of the antique white on for this post.
 Except for the top which has three coats. Big difference between the two wouldn't you say? I can't wait to get home from work tonight and get the other coats on so I can begin the distressing. I will show you that next week!
Have a great weekend!


Have a great weekend!
Thursday, February 24, 2011
WANNA TRY DIGITAL?
Hi there, just thought I would let you know that THE DIGI CHICK is having a sale. If you haven't tried digital (and I can't believe it if you haven't) this may be the perfect time. Everything is 30% off!!!!!

Wednesday, February 23, 2011
PLEASE HELP
I hadn't intended to blog about this because, quite frankly, it has been very painful. My sister Paula recently passed away following a very long (over twenty years - she had early onset) battle with Parkinson's Disease. I happened upon this awareness campaign and thought that, considering the circumstances, I just had to put it up to try to help out. I have included a portion from the site but please click the picture to get more information.

*********
Celebrity Designed and Signed Candle Holders ...
*********
Celebrity Designed and Signed Candle Holders ...
… auctioned to raise awareness of the race for a cure for Parkinson’s (scroll through list below)
Britain’s favourite celebrities have personally designed these 34 candle holders, which will be auctioned on eBay for 10 days starting 7pm on 22nd FEBRUARY 2011. Only one candle holder of each design has been made … making each of them truly unique.
These top quality, bone china candle holders, are made in Stoke on Trent and filled with 100 hour white wax. They are approximately 75mm in diameter and 92mm tall and come in a specially made presentation box. The design has been kiln-fired onto the candle holder, during the manufacturing process, to make it permanent. Remember - the items for auction here are truly unique - only one of each design exists.
Additionally we are auctioning 10 hand signed photographs sent to us by celebrities in response to our appeal for support.
Included with every item is a Certificate of Authenticity signed by The Cure Parkinson’s Trust’s Managing Director.
**************
This is a horrible disease that robbed my sister (and those like her) of her ability to be independent, her ability to communicate well and most importantly her dignity. Please consider bidding on an item or just giving a little to help support research.
Friday, February 18, 2011
REFURBISH IT FRIDAY!
I am starting something new today called Refurbish It Friday. I have been wandering around craft and DIY home dec blogs lately trying to get my craft guns firing and have seen some amazing re-purposed projects. Because of my busy schedule and the fact that my family doesn't spend a lot of time at home, I have sadly neglected decorating my house the way I would like. I want to try some of these great projects myself and am going to show my progress (which may be very slow at times) here every Friday. My house is a smallish, cottage style and I want to make some things that are a little shabby chic (but not too precious) to spruce things up a bit. We'll see how it goes, LOL!
 To start things off, I have this display case which has been sitting in my sewing room, collecting dust, for years. I've seen some really gorgeous ones lately like THIS one by Tammy Tutterow, THIS one found at Two Peas in a Bucket and THIS one from Melissa Samuels. If I can make one half as good as these, I will consider myself lucky!
 The first thing I did was clean all the dust off, he, he, ahem and pry the back off. I then tore off the elvis-velvet background...
 and set it aside to be covered in paper later.

I then sanded the wood with some medium grit sandpaper and wiped it off with some tack cloth.
This may not seem like much progress to you but it is enormous to me considering my schedule and the fact that I have a really hard time getting my booty going on multi-step projects. Next week I will be painting.
If this inspires you, grab a project yourself and follow along with me. It would be so great to have some company to keep me motivated!
I will still be doing some paper crafts here but I am going to be focusing on home dec items for a while cause that is what has flipped my fancy at the moment. I had been so focused on paper crafting that I had no idea how vast and amazing the blog world is for DIY home dec and other crafts in general. Check it out, if you are like me, you will be amazed at the creativity, resourcefulness, and skill these bloggers posses.
Thanks so much for stopping by and have a super weekend!
Monday, February 14, 2011
ROCKIN' DINO
I needed a card for my nephew and his wife's new little baby boy. As I was searching for ideas, I saw a card in the SCS gallery showing a rocking card made from a card kit. Of course, I says to myself (as any good diy'er would) I can make one of those without a kit. And I did. And you can too.
 It had a bobble head but of course I had to go one step further to make the legs move too.

 Is this not adorable?
Here is the tut.
I used the shape from an SU punch and my copy machine and made it BIG. I have a PDF of this base, the rocking part of the card, at the end of the post. Cut it out of a good strong card stock.. This is a light blue (bashful?) from SU. Score along the middle.


I messed up and put a liner in last but if you want one, do it now, it is much easier.

I used elements from a great digital kit called DINO ROAR found at JUST SO SCRAPPY, cuuuuute!
Using photoshop, I put together some grass and a hill and attached it to the bottom of the rocker.
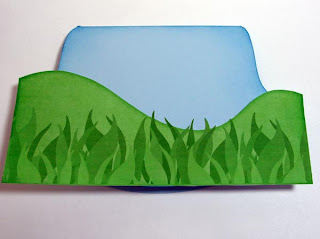
And then trimmed it off the bottom using the rocker as a guide.
 I sponged around the edges with some old olive ink and some blue (can't remember which) around the top
 I sized up the dino to about 6X6 inches and printed out two on matte printer paper. You could also do this on cardstock but I like how the colors come out on the matte paper. It is lighter than cs so I attach it (as you will see) to a cs base.

One was cute out whole and the others head and feet only.


 Hold it while you flip it over and place it on the whole dino.
 Adjust it so that the top head matches up with the bottom head.

Now you have a bobble head dino. Next, punch a whole in the base of the leg as shown. Thread an eyelet up through the bottom.


Here is the tut.
I used the shape from an SU punch and my copy machine and made it BIG. I have a PDF of this base, the rocking part of the card, at the end of the post. Cut it out of a good strong card stock.. This is a light blue (bashful?) from SU. Score along the middle.

Fold it, and play with it a couple times by rocking (the rocking part its optional and just for fun) it back and forth.

I messed up and put a liner in last but if you want one, do it now, it is much easier.

I used elements from a great digital kit called DINO ROAR found at JUST SO SCRAPPY, cuuuuute!
Using photoshop, I put together some grass and a hill and attached it to the bottom of the rocker.

And then trimmed it off the bottom using the rocker as a guide.


One was cute out whole and the others head and feet only.

These were then attached to card stock and cut out. You could probably be smarter than I was and cut them out together.

Take the head-only piece and flip it over. Grab some wire and twirl it around a pencil to create a spring. Use double stick tape to attach it to the center of the back of the head.

Punch or cut two, 1.5 inch circles, and punch a whole in the center of each. Place some glue on one side and put it one over the wire and work it down so that it is against the base of the head covering the base of the wire.

Take the other and place it down over the the first twirl of the wire.


Now you have a bobble head dino. Next, punch a whole in the base of the leg as shown. Thread an eyelet up through the bottom.

Take the extra leg pieces and flip them over. These are going to get a flat topped brad glued to them. You have to place the extra foot with it's matching one to position the brad. Attach the brad with some heavy duty glue. I use E6000 and it seems to hold up pretty well.

Hold the eyelet that is coming up through the back leg of the whole dine and flip the extra leg over so that the brad goes through the eyelet from the FRONT side.

Flip it over and fold the brad prongs over the eyelet loosely. You want it to move freely.

Place some dimensionals on the back of the dino (not all the way to the top cause he sticks out over the card base) but avoid the area around the brad/eyelet so that the foot will move freely.

I printed out a tree and a couple extra leaves and made a little background for the dino.

The leaves were layered on with pop dots.

The tree was attached to the side of the card base first and the dino was placed at the front. Be sure to place the dino so that the card isn't too heavy on one side or the other. If it is off center, based on weight, the card will list to the side - ask me how I know, he he. The head is heavy so you may have to adjust it to the side a bit.

Final touch was an SU sentiment to welcome the new little sweetie. I love this card, it is just too fun to play with.
PDF FILE
Click HERE for the pdf file of the card base. If you have problems (or need help) with the pdf file, let me know (parosc@gmail.com) and I will send it to you via email.
If you make one let me know I would love to see it!
Saturday, February 12, 2011
VALENTINE'S DAY CARDS
Hi there! Still haven't felt much like making a lot of cards lately but I did want to make Valentine's Day cards for my kids. I liked the MOJO MONDAY SKETCH so I used it for my daughter's card. It also fits The Shabby Tea Room Challenge to use a heart on your project.
 I used some new SU paper I got recently, it is such a pretty group of papers. It is from the new mini catalog but I can't remember the name right now.


Of course I had to use a robot theme (he is crazy for robots) for my son's card. The stamp and pp is from The Angel company and the letters were made using the mini monogram cartridge and my cricut.
Hope you have a very sweet, chocolate covered day!
Friday, February 4, 2011
A SWEET BOUQUET
Hope those of you who are experiencing miserable weather (like me) are staying warm! Hopefully my Valentine's Day project will bring a little cheer to ya. This is a little lollipop bouquet for your sweetie. It was made mostly with digital supplies available at THE DIGI CHICK. I have a tutorial on how it was made over at THE HYBRID CHICK BLOG. This was also made for the PAPER CUBED CHALLENGE to create a 3D project with a Valentine's Day theme.

And even though I am not much of a football fan I have to say.... GO STEELERS!!!

And even though I am not much of a football fan I have to say.... GO STEELERS!!!
Subscribe to:
Posts (Atom)


