Thursday, April 3, 2014

RECLAIMED COFFEE TABLE

When we tore our old deck down I thought it would such a waste not to reuse the wood that was left.  I finally decided that I wanted to try to make a hybrid coffee table out of an old table I found at the junk store ($10) and the deck wood.  The table had nice legs but a cheap looking top.

This is a picture of the table after I had cleaned it up and given a couple coats of Java gel stain.
The wood was in pretty bad shape but I cleaned it up with a power washer.  If you have never used one of those things let me tell you they are awesome! It took off dirt I didn't even realize was there.  The wood looked great after it had dried.  I wanted an authentic rustic look so I left the nails in the boards and cut them off on the back side.

I used the table as a guide and cut the wood a few inches longer on both ends for an over hang and about an inch on the long sides. I made the cuts so the nails were staggered along each board.
I tried two different stains, Dark Walnut and Java.  I decided I like the Dark Walnut the best.  It is at the top of the wood.
After the stain, I gave the boards three coats of semi-gloss polyurethane.  I should have tried that along with the stain because it is just a bit too shiny for my taste.  My husband helped me attach the boards to the table with wood screws.  

It isn't too bad for something that I just wanted to try out.  I will probably end up using it in the new garage rec room.  


Tuesday, April 1, 2014

SHABBY FOOTSTOOL


I had a drawer left over from my TV stand project. I though I would make a tray out of it but wasn't sure.

I got a new camera for Christmas and I now cannot find the pics of the drawer makeover but it was a simple coat or two of Annie Sloan Old White Chalk paint, a coat of dark wax and some distressing.

  It sat in the basement that way for a while, a looong while, till I decided it would make a great foot stool for my reading nook instead of a tray.


I found some adorable, chunky feet at Lowes and gave them the same treatment as the drawer.
I figured out a general idea of where I wanted to place the legs and made a 2 inch square out of paper to make it easy to mark the area to drill the holes. I placed the square in the corner and made a mark at the corner.  I repeated this all the way around for all four feet.  
The screws on the feet had to be unwound a bit so they would be long enough to fit through the drawer with enough room for a washer and bolt.
That was pretty much it for the stool.  I then went to JoAnns and bought a square of polyfill stuff.  I don't really know how to define it but it was less expensive than foam and had a nice stiffness I thought would be good for a stool.  I had to trim a bit off one side so that it would fit inside the drawer.  It was pretty easy with a pair of large, sharp scissors.
I had some cotton batting on hand so I decided to give it an extra layer of softness.  I draped it over the block and pinned the edges as shown on the left side then trimmed off the excess as shown on the right side. I then took it off and sewed up the corners.
I pressed it, flipped it and put it over the block.  

I repeated the process with some fabric I had left over from some pillows I had previously made.I didn't finish it off on the bottom because I am not sure I want to keep that fabric.  It all got tucked into the drawer and ta da, a cute little foot stool.

How sweet are those chubby little feet?  It not only looks cool but I use it all the time.  In fact my feet are propped up on it right now as I right this blog post!

Hope you have an awesome week!
KIM

Come Link Up at...Elizabeth and Co.
From My Front Porch to Yours
Photobucket

Saturday, March 29, 2014

CUPCAKE SATURDAY

CHOCOLATE PEANUT BUTTER CUPCAKES

Have you ever watched Cupcake wars on Food Network?   I love all the drool-worthy cupcakes and am always wanting to try out the recipes.  I asked my son if he would like to help me try out some recipes and he was happy to be my assistant. I have never made a cupcake from scratch and it turned out to be a fun activity with my son.  Not to mention we got a tasty treat when we were done.

Our maiden journey into cupcakes began with a recipe for CHOCOLATE PEANUT BUTTER CUPCAKES I found at the ANNIE EATS BLOG.

There were three parts, the cake itself;


the peanut butter filling;
and the frosting;
The cake batter was used as a base, the filling was placed in the center and covered with more batter.
The cake batter seemed kind of thick, but I am no expert so we just went with it.
They turned out pretty well but the tops of the cake was a little hard (maybe the batter was a little dense) and my husband (our flavor tester) thought the center which was a bit dry, maybe sucked  the moistness out of the cake.
The best part was the peanut butter frosting, yum!  Overall, everyone liked this one, but agreed it needs some modification to address the dryness issue.
Thanks so much for stopping by!

KIM


Thursday, March 27, 2014

SCIENCE NERD FUN

Howdy!
Since I am a complete science nerd, I am always on the look out for fun, science related stuff. I usually just hoard it and never use it.  At the end of the Fall semester, I wanted  to give the  teaching assistants a thank you for all their hard work so I decided to make use of my nerd-ware and make them a little something.

From my hoard, I pulled out my lab ware cookie cutters from Think Geek. And made these cute cookies.  I found some neon food coloring at the grocery store that was perfect for the icing and some decorative sprinkles for the fizzy effect.

None of my experiments ever looked this tasty.

Next up was a thank you card in the form of a lab coat.  It was made from a half sheet of white card stock, scored on either end at three inches and notched  edges that were folded back to look like the collar.
I used the periodic table to make a little thanks tag that would be attached to a test tube (clean/new) that held Hershey Kisses.
The stamps are from a chemistry set made by There She Goes clear stamps.  I don't know if they are still available but I am sure there are other sets like this.

This was the envelope.

I punched a little hole in the upper corner of the envelope and used a ribbon to attach the test tube and thanks tag.  
It was a fun little gift and it was nice to be able to share some of my stash of nerdiness.


KIM

Tuesday, March 25, 2014

FITTING COMMERCIAL SEWING PATTERNS

Hi there!

I have a classic apple shaped body (thanks mom...) which makes fitting commercial sewing patterns a challenge, particularly since I don't have a lot of free time. And even when I did make some time to alter patterns, the garment still didn't seem to fit properly.   I had pretty much given up sewing for myself until I found a great fitting book in my web travels. It has pretty much solved all of the challenges that have kept me from making clothes for myself except for the lack of free time of course.

 I have tried most of the traditional pattern alteration techniques like cut and slash but this one is different and has worked out really well for me.


  The technique is based on the premise that no matter how much your bust, waist and hip measurements change,  your arm to arm chest measurement never does. Therefore, this one measurement  should be used when determining your pattern size.   Mind. Blown.

Pattern Fitting with Confidence by Nancy ZiemanPattern Fitting with Confidence by Nancy Zieman
I had been buying patterns in a size 14 or 16.  When I took this measurement using Nancy's instructions, it indicated that I should be buying a 4-6.  I have a very small neck area and have always had problems with gaps and loose necklines in both pattern fitting and ready to wear.  This technique seemed  to make so much sense to me.

I chose a simple pattern to try out the technique and this was the result.  A perfectly fitted top for the first time since the olden days when I drafted my own patterns.  Holy cow was I happy! It still took a bit of alteration of the pattern but the difference is that I ended up with a wearable piece of clothing.  
I have several tops I have made hanging in my closet. Even though I like them,  I never wear them because the fit isn't quite right.  I wear this one all the time.  I made it out of a nice quality, comfy cotton knit in a style that is good for apple shapes.  

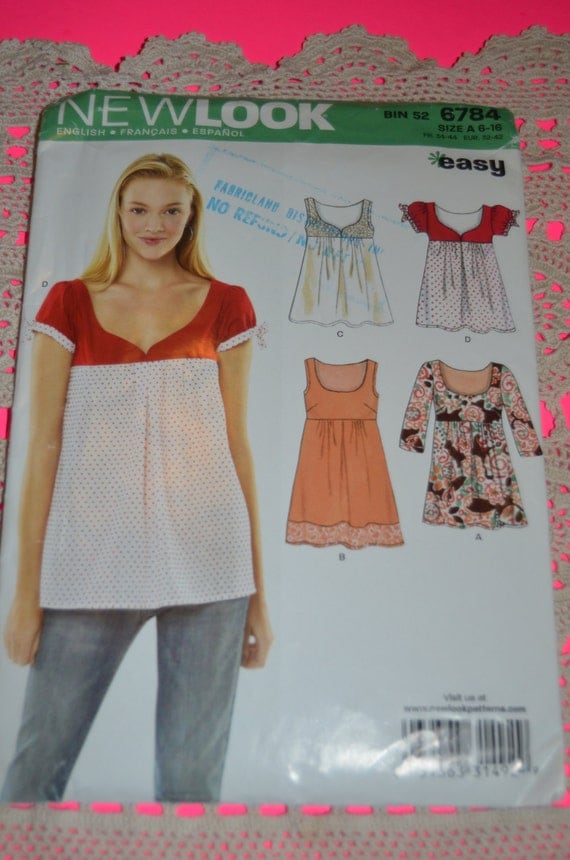
New Look 6784 Womens Top Sewing Pattern - UNCUT - Sizes 6 - 16The pattern is  New Look 6784 view A.
The three quarter length sleeves turned out a little wide at the bottom. Instead of taking them in I made a little tuck on the edge to make them a bit narrower and added a decorative button.
I checked the book out from the library to try it out before I bought it.  Once I saw how well it worked I immediately ordered it from Amazon and and have been thrilled with it.  

If you have been thinking about learning to sew or getting back to it after an absence run as fast as you can to your library and check it out to see if it works for you too.  If you do let me know I would love another sewists perspective!

If you want a little preview, check out Nancy's intro video HERE.  

KIM

Saturday, March 15, 2014

CROCHET BOOT CUFFS


I have been trying to teach myself to crochet. I started quite a while ago in an attempt to make my son a crobot. They are these cute little crocheted robots that took a lot more crochet talent than I had at the time. I started that little bot about 50 times and ripped it out 50 times. Needles to say, it never got made. I found renewed interest when I saw these cute boot cuffs on (where else) pinterest.


DIY crochet boot cuff
They looked kind of simple so I found some basic tutorials on youtube and bought the book "I TAUGHT MYSELF TO CROCHET" at Walmart.  It is a pretty good book and helped as much or more than the tutorials on youtube.  After a bit of practice on the all the basic stitches I attempted the boot cuffs.  They are certainly not perfect but they came out pretty well.  The instructions for the cuffs are really great too and you can find it HERE.

I used Vanna White's yarn in oatmeal (bought at JoAnns) and I chose to put on a flower instead of a button.  The tutorial for the flower is reeeally easy,  very detailed and can be found HERE.  They look great with my calf high boots. 
My daughter liked them so I made her a pair too.  It took about 2-3 evenings while watching tv to finish a pair.  


I still want to make that crobot but I think I need a little more practice first.  Click HERE if you want to check out my crochet board. So many amazing projects!  So not enough time!

Have a great week!
KIM

Thursday, March 13, 2014

MUSIC MAN

I really love this gift I made for both my nephew and my son. They are both into music big time and I thought the bags would make a nice carrying bag for music books, drum sticks, etc.
I used a bag my son had as a pattern and the fabric is a nice quality sweatshirt fleece I purchased at Joanns.  I bought the embroidery music font from an etsy store HERE.  How cute are those letters?
I also made my other nephew a bag reflecting his interests.  He loves to hunt so I mad him a bag that I thought he would like. I bought this design at Embroiderydesigns.com.  I can pretty much purchase designs from anywhere for use with my machine.
I can't believe i thought I could never have much use for an embroidery machine. Boy was I wrong!

Happy crafting!
KIM

Tuesday, March 11, 2014

PERSONALIZED GIFTS

Happy Tuesday!
I made use of my new embroidery machine for Christmas gifts.  I made this make up bag for my niece.
I got the fabric in the quilting department at Joanns and used a make up bag that I have as a pattern template. My machine allows me to use any regular computer font for lettering so I used the curls font for the name. 

I used the same fabric for a purse for my other niece.  I made the purse using Simplicity 2396. I had to extend the pink section about 2 inches to make room for the name but the pattern was pretty easy.
I love the colors in the print fabric.

After seeing the make up bag, my daughter wanted one so after Christmas I made her one also.

I will have a couple more embroidery gifts in upcoming posts.  I have also been teaching myself how to crochet.  My mom is a wizard at it but I have been limping along so I may (or may not)  post a couple things I have done.

Hope you have a crafty week!

KIM

Linky Parties
Tip_Me_Tuesday_Button_TipJunkie-jpg
Elizabeth and Co.

Friday, March 7, 2014

VWORP VWORP

Unless your a Dr. Who fan you may not be interested in this post.  I love the Doctor so I made a TARDIS wall hanging (more like a wall covering) as a Christmas decoration for my door at work.  I used a lot of blue felt and  my embroidery machine to make the lettering.

I was surprised by how many Whovians there are in my workplace.
I took a picture off the internet and used that as a guide for cutting out the pieces.  It was mostly squares and rectangles so it wasn't too difficult. I am so lovin' this embroidery machine.

I'm looking forward to seeing how the new Doctor fits in. 

 Any of you fans?
LINKY PARTIES
  By Stephanie Lynn Skip To My LouTip_Me_Tuesday_Button_TipJunkie-jpg