Wednesday, March 31, 2010

IS THERE A DOCTOR IN THE HOUSE?

Happy Wednesday!
I have another sneak peak of the GET WELL set by Marina Neira from The Greeting Farm available April first. This is the other adorable image (I used the other for the candy wrapper)found in the set.

I tried to make a Doctors Bag using the faux leather tutorial I found at SCS. It looks more purse-like though so I think it needs more work, maybe flatten and elongate it a bit. I do like the technique, it looks and feels pretty cool.

It must be the Easter holiday,I just can't get chocolate off my mind so I used it for this project as well. Nice to send well wishes along with a treat, eh?

I have placed the image, sentiment and treat on the inside for a little surprise.


There is another fun preview over at The Greeting Farm's blog for you today also using the new "Get Well" set.

Even more heartwarming, we are calling all of YOU to action by heading up a CHARITY CARD DRIVE for sick children and their families this week.   Tomorrow you will hear more about that from Jessica and be given instructions on how you can enter this card drive and put a smile on the faces of not only a sick child, but hopefully their parents, siblings, and all who are affected by all of the heartbreaking illnesses out there.  We have been wanting to do this for some time and I'm really happy about it; can't wait to see how many cards we can collect for this wonderful cause!

We are also really excited about release day tomorrow AND the announcement of this contest.  Because it will be the focus of the TGF Release this month, sans Blog Hops, etc...we have put together a HUGE prize for this contest, so stay tuned!   In addition, there will be prizes given away tomorrow on our Release Day so be sure to stop by the TGF Blog for the Official Contest rules but also a comment contest tomorrow....who DOESN'T like a little immediate gratification ;)

The Design Team-Farmers and Critter Crew alike, have some SUPER cute samples today on the TGF Blog and our own personal blogs too!  Thanks for stopping by!  In fact, ONE LUCKY WINNER will be chosen today from ONE of our blogs to WIN this "Get Well" set by Marina!  WE don't even know who's hiding it...so be sure to make your rounds (heehee, just like a doctor would to "Get WELL!") if you have the time and GOOD LUCK to all!

See you back here and on the TGF Blog tomorrow!

Tuesday, March 30, 2010

DESIGN TEAM SEARCH and THERE IS STILL TIME!

There is still time to get those projects linked up HERE at Paper Cubed challenge blog!

Since I see I am not the only one crazy for 3D I thought I would assemble a DESIGN TEAM to share in the fun!

HERE IS THE DISH:
I am looking for fun, fresh ideas that are well executed, unique and inspiring. I am looking for think outside the box designers so if you have ever been told (or thought yourself) you are just a bit different, love 3D and can commit to one project a month, we need to talk!

Challenges are posted on the first of the month and the design team will be eligible for the prizes (picked randomly). The term is for 6 months. With the exception of May (see note* below) designers will have nearly the entire month to create their project.

TO APPLY:
1. Check the PAPER CUBED CHALLENGE BLOG on April 1st to see the newest challenge, then run as fast as your little legs will carry you to your craft room/area and and make an outrageously fabulous 3D item based on the inspiration piece.
2. Send a picture of your creation along with the following information to papercubed@gmail.com
a. A brief description of yourself and why you love 3D
b. Your blog address if you have one or links to the galleries that you post to. Don’t worry if you don’t have a blog, this is a “for fun and inspiration” challenge blog, I am not trying to promote anything. You do need to be able to take a good picture though so I will be taking that into account!

DEADLINE IS APRIL 16

New team members will be notified by April 18th
*for this month only there will be a time crunch – 2 weeks to get your first project done for posting on May1st.
If you are still with me after all that blah, blah, blah get crackin and send me those projects!
HAVE FUN!!!!

Monday, March 29, 2010

BUNNY..I MEAN BLOG HOP!

Welcome to the KELLEIGH RATZLAFF DESIGNS Blog Hop!
Easter is just about a week away and I made a couple of treat holders for my niece and nephew.

These were so easy to make using Kelleigh's Easter Egg Basket Template. It is all digi so you just download and print. The papers, including the sweet little bunny and accessories are also digi, appropriately called Easter Hop by Pamela Donnis. Both template and papers are available at THE DIGI CHICK.
I printed out an extra front egg piece and used my Spellbinder oval die to cut out the opening to make a sort of shadow box. I used lots of dimensionals to give it some depth.
Here is the blog hop list so you can make sure to visit each and every one of theses talented ladies!
If you have never tried digi here is your chance. One lucky hopper (that’s you) will win a $10 gift certificate to Kelleigh's store just for commenting on KELLEIGH'blog post with your vote for your favorite Creative Team project. One lucky Creative Team member will win $10 in PayPal cash for earning the most votes!! The Blog Hop contest winners will be announced on Thursday, April 8th.
Kelleigh
Tracy
Sally
Laura
Juli
Julie
Christy
Dana
LuAnn
Jacinda
Viva
Dalis
Holly
Sharyn
Karen Lewis
Linda
Alice
Mel
Sunghee
Carolina
Debbie

Sunday, March 28, 2010

IT FASCINATES ME!

For all you (many) Twilight fans.
I made this little set with a card and matching votive. The stamps are from the new EPIC TALES set from ARTFUL INKABLES. If you can't get enough of Twilight, I suggest you check out this and the other fun, twilight inspired sets available from AI.
I totally lifted the background for this from Michele Zindorf (whose work I adore) She had just posted THIS tutorial on her blog and I knew it would be perfect for what I had in mind. I can't wield a brayer like she can so I sponged mine instead. I really need to take one of her workshops!
This was an inexpensive glass votive holder from the craft store and I finally got around to using my Grafix Rub-onz that I have had for quite some time. It was really simple to do. I dumped a handful of these little clear glass beads into a plastic bag and added some plum colored alcohol ink. The "candle" is one of those fake plastic, battery operated ones that is so much safer than fire. I rimmed the top with a gold leafing pen - don't do this if you are using a real candle -poof!
I immediately gave this to my teenage daughter, I am sure you can guess why!

Friday, March 26, 2010

CHOCOLATE MAKES EVERYTHING BETTER!

I can't remember which Harry Potter book it was but every time someone had a difficult moment the character was given chocolate to sooth him or her. I am inclined to agree that chocolate can make just about anything better.
I recently wanted to make a card for a family member who wasn't feeling well and I realized that aside from some flower stamps I didn't really have any "feel better soon" stamps. Just like magic though, I received this GET WELL set by Marina Neira for The Greeting Farm which will be available on April first.

This week's FARM FRESH FRIDAY CHALLENGE is to make a project using these colors;

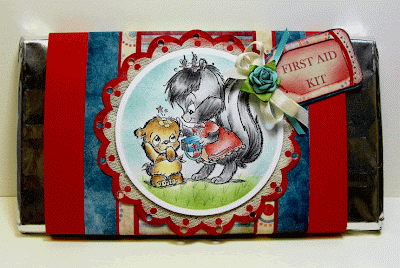
For my sweet "first aid kit", I bought the biggest chocolate bar I could find  and used the image to make a candy wrap. The sentiment was computer generated.
Go ahead, go have some chocolate, you know you want to and I just know you will feel so much better!
Have a great weekend!

Thursday, March 25, 2010

HEY!

Hows it going? It's nice to send a card to someone without a special occasion, just to say "hey, how are ya".

This is Camille, from The Greeting Farm and I love how she can be used for a lot of different sentiments from sassy to sarcastic to serene.
I used the MOJO Monday Sketch for the card, I like this one because it is long and I don't usually think to make that type of card.
A simple card and a simple sentiment, sometimes that's all you need to make someones day a little brighter!

Wednesday, March 24, 2010

ORNAMENT TUTORIAL

I have a tutorial on how I made this ornament on the PAPER CUBED CHALLENGE BLOG. There are 7 days left to get in on the fun of the challenge!

Tuesday, March 23, 2010

IT'S A BIRD, IT'S A PLANE, ITS......

SUPER IAN!
I found the instructions for this "super" cool slider card from CREATIONS BY PATTI she always has amazing projects and I visit her blog often for inspiration.
The tab is pulled up to reveal the sentiment and as it does it sends our superhero into the sky.

I used Ian from THE AMAZING DUOS set and some bright digi paper by Kari Hentzel called Time to Play
Have a SUPER day!

Monday, March 22, 2010

WELCOME SPRING and BLOG HOPPERS!

Welcome to the Artful INKables blog hop! We are celebrating the March release at Artful INKables with 4 wonderful sets and a super fun new mini set!

If you haven't come here from ANN's Blog, be sure to hop on over to the Artful INKables Blog, you don't want to miss anything for today's hop!

It was so wonderful to have a little taste of spring this weekend! I got a little bit of yard work done in hopes of doing some planting soon.  In the mean time I got in the spirit of things by making these spring time projects with a new set called IN  MY GARDEN
I adore this set, I can see using it over and over for so many different things!
The set seemed perfect for some shabby, vintage looking projects so I made a card and a little gift basket to tuck some treats or maybe a few packs of flower seeds.

The basket was super easy to make, the instructions were found HERE
Make sure to comment on every one's blog, because two lucky commenters will win some AI stamps! One will win In My Garden and Epic Tales, and the other will win Peacock Pagentry and Paisleys & Peacocks. Please leave your comments by Thursday, March 25th, 12 midnight Eastern Standard Time. The winners will be chosen on Friday, March 26th.

Thank you for participating in today's blog hop, now hop on over to JOY's blog and enjoy the rest of this wonderful release!

Sunday, March 21, 2010

HAPPY BIRTHDAY!

ARTFUL INKABLES is turning 2 and if you would like to help celebrate, join in on this weeks THINK INK CHALLENGE to create a birthday card.
For my card I used the BIRTHDAY BEST set and made it as bright and cheery as possible.

To celebrate, AI is offering a sweet deal on any order you place this week. Enter Code AIBDAY2 into the coupon field when you check out to get 15% off a $35 order. This coupon is only good until this Sunday (today) so be quick like a bunny to take advantage of this SALE!

Please stop back tomorrow (especially if you are a twilight fan) for the new release blog hop!

Friday, March 19, 2010

OLDER THAN.......

DIRT, I THOUGHT, DINOSAURS?  You pick, cause I think this card would work for just about any of them.  It would also make a nice little boys card of course but I kinda like the age jokes.
This week's FARM FRESH FRIDAY CHALLENGE is to use this super cool sketch from the fabulous farmer MARY.
I used the OA-HAPPY DAY SET from THE GREETING FARM and I just adore this little guy. He actually reminds me of my daughter who was never interested in Barbi or any other types of dolls but played endlessly with a huge tub-full of dinosaurs.

Have a great weekend!

Thursday, March 18, 2010

KEEP ROCKIN!

I can do goth, snort. Sorta. It's cutesy goth but it's goth nonetheless. It was fun taking a detour and trying something different... and this was the result.

I took Ebony (from THE GREETING FARM) on a trip to the dark side. Hey, it has flowers and paisleys how dark could it be?
I used the Mojo Monday Sketch which looked a bit too sweet so I dirrrtied it up a little. I am sure this will be perfect for one of my daughters friends.
See you tomorrow for a Rockin' Farm Fresh Friday Sketch!

Tuesday, March 16, 2010

ARTFUL INKABLES SALE AND CHALLENGE!

Just thought I would let you know that ARTFUL INKABLES is having a sale to celebrate their second Birthday. Not that I would want to be an enabler or anything like that he he!

To celebrate, they are offering you a sweet deal on any order you place this week. Enter Code AIBDAY2 into the coupon field when you check out to get 15% off a $35 order. This coupon is only good until next Sunday so be quick like a bunny to take advantage of this SALE!

Also be sure to check out the next Think INK challenge and to see who won the last challenge. And, mark your calendars for NEXT MONDAY because we will be having our NEW RELEASE BLOG HOP featuring all of our new, uber-talented INK girls and FOUR new stamps sets you will surely LOVE!

And finally, if you are located in the Salt Lake City area of Utah, be sure to come visit our booth at the SCRAPBOOK USA expo in Sandy on March 26th and 27th. Click HERE for directions and information.

It is also THINK INK Tuesday which means a challenge where you can win a GRAB BAG of AI STAMPS! Just make a Birthday card and post a link at the ARTFUL INKABLES BLOG.

Monday, March 15, 2010

A HYBRID TEACHER'S GIFT

Happy Monday! I think that is an oxymoron, especially since we lost an hour of sleep on Saturday night.  It is amazing how much an hour's change can affect one's body.
Today I have a cute little box template that was originally created by Kelleigh Ratzlaff to be a candy dispenser. You can see an example of it HERE. It is a template available, along with the digital paper that I used, at THE DIGI CHICK.
I made the box into a little teacher's gift. I added a side holder to tuck in a little pen and attached a pack of post it notes to the top. The top opens up to allow you to add candy which I replaced with paper clips to go with the them. You could just as easily put in rubber bands or another small office supply. Everything is all together in a a neat, pretty little package. The beautiful paper used for this project is called VINTAGE GIRL. It has a range of soft pretty papers perfect for a shabby chic look.
I know I am a little early for teacher's gifts but with my crazy busy schedule I need to plan ahead and these are so easy to make.

Saturday, March 13, 2010

TANKS A LOT!

Hope you all are having a great weekend! I am off to help out at my daughter's Drum line competition.  I am working the candy gram table so it should be fun.  If you are interested in knowing what drum line is you can check it out HERE. This isn't my daughters group but last years.  If you can stand the noise it is pretty cool.
I thought SOLDIER IAN needed some transpo so made him a tank.
Click HERE for a PDF (yay, I think i figured it out, if not email me and I will send you a copy) of the pattern pieces.You will need to download the pic and then print yourself a copy.  I am absolutely, positively, NOT perfect so you may have to tweak it a bit to get it to work.  Meaning don't B**** if it isn't perfect LOL!
Here is how I put it together. Please READ the instructions there are a few points that aren't obvious from the pictures

Cut out the pieces shown out of patterned paper. The circle was punched with 1.5 inch circle punch.

The pieces were then glued to a piece of dark green card stock and I free hand cut around the edges leaving about an 1/8th of an inch of dk green border. This gives it some body and also gives a bit of shadow effect for the image.
Four, black, 1-1/4 inch circles and four dk green 1 inch circles were punched.

And assembled as shown using a brown brad in the center.
The wheels were attached to the base with pop dots to give a little dimension
For the base of the card a black piece of CS was folded in half.

The top of the tank was placed along the fold in the black cs.

I traced around the pattern piece and cut it out.
Attach the pattern pieces shown above first. The black card base should stick out around the pieces just a bit (again a little shadow effect) so don't worry if everything doesn't fit perfectly.

The top part  fits over the circular lid of the tank is placed flat against the black base. The bottom part had a double layer of pop dots along the top edge so that it fit on top of and clears the wheels.
And she is all ready to roll.... but don't forget to attach Soldier Ian!

Friday, March 12, 2010

A WEE BIT O' BIRTHDAY WISHES

Happy Friday and I soooo mean that. This week has been dragging despite of or maybe because of the lovely weather we've had.
This week's FARM FRESH FRIDAY CHALLENGE over at THE GREETING FARM is to make a Birthday card.

In honor of St. Patty's Day and the fact that I adore this new My Minds Eye paper, I went with a bit o' the green for this one. I used one of the DARLING SISTERS to send lots of love and Happy Birthday wishes.


Have a great weekend!

PROJECT STUFF
STAMPS - The Greeting Farm, Darling Sisters
PAPER - My Minds Eye, Black CS
Etc., - Prisma pencils, gamsol, flower,leaf, border punch,, ribbon, chalk

Tuesday, March 9, 2010

FANCY TAGS MATCHBOX TUTORIAL


I have a tutorial up today over on my challenge blog PAPER CUBED showing how I made this little box.

Saturday, March 6, 2010

YOU ARE SUPER!

Happy Saturday to ya all! My daughter is at drum line practice all day and my husband and son are going to the hockey game (go Pens!) so I get the whole day to myself to craft, Yay! So I am in a SUPER good mood and have a super(hero)card for you.

Our super hero is from the AMAZING DUO SET by THE GREETING FARM. She is flying over the land to make sure nothing untoward happens to the fair citizens!

I was going to use pop dots for this but decided to try a method that would allow the card to be folded flat to fit in a typical envelope. I gave the sides an accordion type pleat in place of the pop dots. I ran the wire up the back of the card and placed a layer of paper over to conceal it. The wire can be bent down to fit in the envie and then popped back up (along with the card) when it is removed.

This card went together so fast because I used the digital set EVER GLEN also by TGF for the patterned paper. The trees and shrubs were already put together for me, I just cut them out and pasted them together.

Happy Crafting!

Friday, March 5, 2010

WHO WENT DOWN THE RABBIT HOLE?

She looks so sweet and innocent doesn't she? Until you take a closer look and listen carefully....
"Me, go down a dirty rabbit hole, like, no way!" "Yaaaaaawn, I think I'm a bit hungry."


Looks as though the poor rabbit got the raw end of the deal this time, bwah ha ha (laughing in my most maniacal voice). Ok, enough of my sick humor, I love these twisted chicks and I can find endless ways to use them, how bout you?

This weeks FARM FRESH FRIDAY CHALLENGE "Down the Rabbit Hole we go!", direct from Jessica "I'm a wee bit crazy for Alice" Diedrich, is to create an Alice-Inspired card to celebrate the movie coming out today!
I enlarged FREAKY FLUTTER to about 6 inches high, cut her out and mounted her on some card stock. I punched out a hole in her cake/tummy and placed the bunny inside with pop dots.

A shout out to our critter crew who are returning for another tour of duty (yay!!!) and two super new members. Please check them out, they are amazingly talented ladies and you will be so inspired by them all!
Mercy Kerin
Sandra MacLean
Sparkle Smith
Jami Bova
Heather Schlatter

Tuesday, March 2, 2010

PARACHUTE TUT!


I used a compass to make a basic circle about 3.5 inches in diameter.


A one inch circle punch was used to make a template for the indented parts of the parachute.


I wanted a little dimension on the front of the chute so I used another circle and some dark brown ink and sponged some shading where one would see the seems.


I added a layer of dark brown CS to the back and taped on some embroidery floss "straps".


A flat brad was attached to the back of the parachute using E6000 glue. I like this type when I want a strong bond.


A whole was punched in the top left corner of my card base and an eyelet was inserted from the back and attached with a little glue. Ignore the second hole, it was a boo boo.


I placed a layer of patterned paper over the back of the parachute to cover all the tape. I punch a whole in this layer so that the brad would fit through. Th brad was then threaded through the eyelet located on the front of the card base. The legs of the brad were then bent around the back of the eyelet to secure it.


I Stamped Easter Anya and cut off her pony tails which were then glued to Soldier Ian's head.


I taped the floss to Soldier Anya and glued a brad to her back. I placed a layer over that to cover the tape.


I used the brad as a guide to form the slider opening. I just followed along the brad with a soft pencil line and then cut the opening with my craft knife.


An eyelet was place through the back of the card base but was NOT glued so that it would slide along the opening. The brad located on the soldiers back was threaded through the eyelet as before.

I placed a layer of navy CS over the back (popped up with dimensionals) to cover everything up and make it nice and tidy.


Thanks so much for stopping by and have a great day!