The flower pot from the IN MY GARDEN set was used to make a little name place card/treat holder. I think it would be perfect for a Mother's day brunch. I have a short tutorial on how it was made below.
The next stop on the hop is DAWN'S BLOG.
Make sure to comment on everyone's blog because on lucky commenter will win a $10.00 gift certificate to spend at the Artful INKables store! Please leave your comments by Friday, April 23rd, 12pm EST. One lucky winner will be chosen Saturday, April 24th.
TUTORIAL
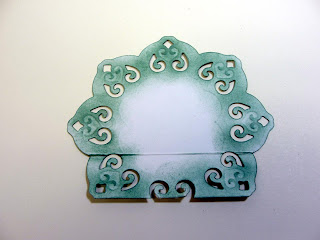
Since the paper used was one-sided, the back was sponged with coordinating ink. The bottom was scored about one inch up and parallel to the flat edge and folded in toward the sponged side.
The two sides were attached to form a sort of envelope.
The rectangle is 5-3/8X2-1/4 inches. It was scored at 1-3/4, 2-1/2, 4-1/4, and 5 inches parallel to the short side and at 1/2 inch along the long edge.
Form the box as shown.
The sides of the box were scored so that the edges fold inward.
The box was then attached inside the die cut pieces and the front was decorated as shown above. A piece of ribbon was threaded through the holes in the die and tied at the front. It is pretty small but would hold a box of tic tacs or other tiny treat.


27 comments:
ooh..this is gorgeous! Looks so sweet! thanks for the lovely tutorial too!!
Sammi
xx
beautiful!!!! Thanks so very much for the tute. Love to see how things are made!!!!
This project is just awesome and inspiring! Love the colors and your creative MOJO! Thanks for a easy to follow tutorial too.
Lovely and thanks for tutorial!
This is awesome Kim! Your so creative!
this is gorgeou, great tutorial!
Awesome...What a beautiful inspiration. Thanks for the tutorial. I love it.
So VERY pretty...thanks for posting all of the details too!
Wow! This is simply stunning! I love the colors and the way you created such a cute little package! Fabulous!
This is SO pretty! Love the paper choice, and all of the cute little details on the front :)
What a cute little treat box! What a nice thought! That extra touch that says you care to make it the best that you can. TFS!
mdot kdot schmidt athotmail dotcom
GORGEOUS!! Thanks for the inspiration and tutorial. TFS!
What a neat project. Thanks for the tutorial!
Jessica Hammond
This is gorgeous. Thank you for showing us how you made it.
Great tutorial for a very pretty project!
Fab, Fab, Fab!!! Thanks also for the tutorial! I was thinking about doing one for my card but I wasn't sure how to fit it in without it distracting from the hopping. You handled it perfectly. I'll have to follow your lead next time! Thanks!
Beautiful project and thank you for the amazing tutorial.
That is beautiful. my favorite colors too.
Thank you for the tutorial
Hi Kim!
What a creative and beautiful project this is! I always love to find new ways to make treat containers. Thanks for all the info on them. Yours is just gorgeous!
Wow Kim this is beautiful
love tasha xx
Holy Smokes that tote is gorgeous!!
Hey Kim....This is GORGEOUS!!! I came by to Thank you for the AWESOME comment on my blog and I'm the one that gets to see your GORGEOUS creation!!!!!
What a cute idea for a luncheon. Thanks for the tutorial and you made me want the stamp and the die.
Hi Kim! Just when I thought that I didn't need this particular die! Beautiful, and the tutorial is easy to follow. TFS! ;) Tracy
This is GORGEOUS Kim! I love the muted colors and that flower stamp! I agree your tutorials are awesome, they're so easy to follow!
This is stupendous! Wow, thanks for the great tutorial! Beth
What a fancy little treat bag! Thanks for the fabulous tutorial.
Post a Comment